After & before

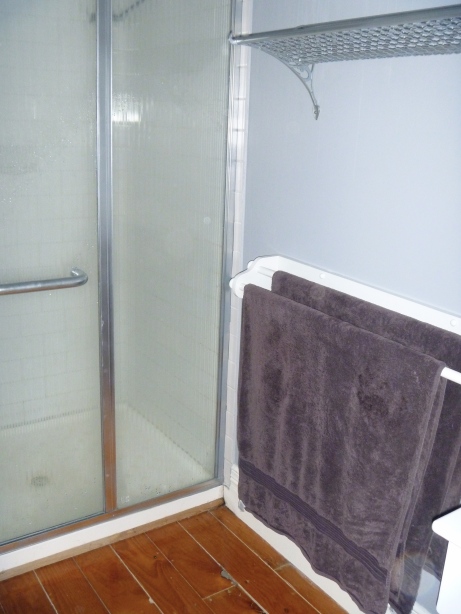
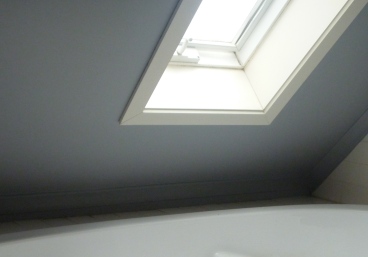
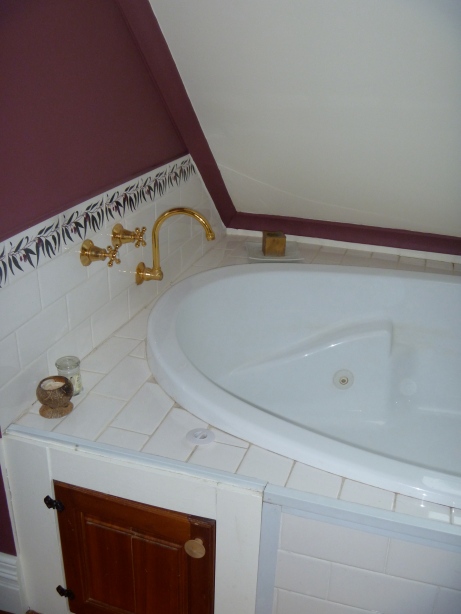
So there it is! A brighter, lighter bathroom, much easier to relax in while soaking in the hot tub! Its been finished for awhile now, I have just been extremely slack in documenting it all and taking the new pics.  I absolutely love the new blind I found from Spotlight for around $25 on sale. What a bargain.  I think it compliments the new colour scheme perfectly. I searched for the little glass handles for the vanity for days and days, but eventually sourced some just in time, and bought the very last ones the store had.  They are just perfect.  Spraying the gold shower frame, taps and shower head was a big job…. and a smelly one.  Even with good ventilation, a mask and lots of holding my breath while spraying, I still ended up with silver snot! Haha. Not something you see every day. Hoping not too much of the stuff made it to my lungs.  Without the spray painting though, the whole room make over would have been pointless… there was no missing that gold!

Here’s a little reminder on what it used to look like…..

painting & gymnastics, day 3

The bathroom ceiling is done. Hallelujah! The brown timber ceiling was a challenge. It required 4 coats of paint which was time consuming and tiring & made my arms hurt more than my boxing class.  It was however the gymnastics required to paint it that was interesting. The 45 degree angle of the ceiling together with limited placement options of the ladder (due to a. vanity, b. toilet, c. shower & d. bath) meant that I was often balancing with one leg on the ladder, one in the air or on a wall…..  at one point while I was holding myself in one particularly impressive position for a good few minutes, it did occur to me that years of yoga had served me well.

In hindsight, not safest of idea’s, but what is a girl to do!?

The result- a beautiful, much lighter bathroom.  That gold shower frame is now however looking more hideous than ever in its new lovely surrounds.

I am now looking forward to moving onto ‘prettier’ & ‘funner’ (that’s a word isn’t it?) projects in the bathroom such as the vanity. Lucky for you, the photo’s will be somewhat more exciting too!

Grey Goose Walls (bathroom make over day 2)

I’m not sure if I am more in love with the name of the colour or the colour itself, but here is a peek of my beautiful new bathroom walls….

Now for the timber panelled ceiling…. lots of prep work to ensure the timber floorboards & rest of the bathroom aren’t decorated with white paint confetti! I’ll wash and lightly sand the ceiling first, then 2 coats of primer followed by one coat (hopefully) of antique white.

The gum leaf feature tiles and toilet tiles have also been primed with tile primer ready for me to finish after the ceiling is complete.

Onward & upward…..

Budget bathroom make-over day 1

The budget bathroom reno has begun! My aim is to give our dated bathroom a fresh, light new look for under $500.

Here is what needs to be done:

* Paint purple/maroon & white walls in Grey Goose

* Paint timber ceiling in Antique white

* Paint Gum leaf feature tiles & green toilet floor tiles in a 1/4 strength Grey Goose

* Paint timber mirror, cupboard, towel rack & door in gloss Antique white

* Paint timber vanity in gloss Antique white

* Make new blind/cover existing one

* Spray paint gold shower frame, shower head, taps & faucets! (not looking forward to this part at all!)

So, as you can see, there is a hell of a lot of painting to do…. but really, its the sanding, taping, wiping, and priming that makes me tired just thinking about it!

Here is what I am working with…

I love this charming little vanity. It just needs some love.

Even though tile paint isn’t suited for painting floor tiles, I figure that we can get away with using it for these tiles around the toilet as they aren’t really walked on… and tiling unfortunately isn’t in my bag of skills.

Oh how I long to paint that odd brown cupboard, and that all of that purple.

The gold shower. (Sigh). Initially I thought that maybe, just maybe, with the rest of the painting done, the good ol gold shower frame may not be so bad after all. Wrong. It will only stand out more as being terribly hideous. So, I will attempt to use etching primer and chrome metal paint.

Firstly, I painted the walls. In retrospect, painting the timber ceiling BEFORE the walls to avoid drips and splatter would have been wiser. Hmmm.  Photos of my beautiful new Grey goose walls to come tomorrow.

Bathroom make-over inspiration

When we moved into our dream house last September, an older two story limestone & cedar home with plenty of charm.  We fell in love with it immediately, and there are many features of the home that we would never change.  Over the months there are a few things we have decided to tackle. One being the upstairs bathroom.

Our upstairs en-suite is full of country goodness- just not using a colour palate that suits our taste.  I believe they call it federation green & purple/maroon. Add to that timber ceilings, timber floors, timber vanity, timber towel rack & cupboards …. you get the idea. At some point, a full renovation may be on the cards, but for the moment a simple lengthy paint job and some creative tile painting to hide some ‘interesting’ border tiles should suffice.

This is my budget bathroom make-over inspiration! I love the grey, blue & white colour schemes in this bathroom on http://www.decorpad.com

Not really a hen…

On the weekend we finally picked up three new hens… Well actually, we picked up two hens and a young rooster who we initially thought was also of the ‘laying’ kind.  Looking at this picture, its so obvious now… but he had us all fooled for a little while. The owner of the property was out when we arrived so his friend helped us gather three from the large pen full. Fair to say his ability to tell a young hen from a rooster was as terrible as ours!

We debated keeping ‘Comet’, but as we are new to the whole backyard chicken thing, didn’t think we were quite up to having a rooster too.  None the less, it was hard to take the poor little guy back as I’m not sure what his fate will be….

Here are the 3 new girls Gertrude, Mabel & Lola! (I can’t help it.. I have to name them)

The new girls will spend a week or so confined to the coop before being allowed out to free range with the other chooks & the dogs.

The first night I decided to walk down the back of the property (with candle in hand as all our torches had died) to make sure the new girls had found their way to the perch in the sleeping quarters. After awhile of searching (pretty hard to find them in the dark!) I found them huddled in the corner of the run, out in the wintery cold.  I quietly picked them up one by one and put them on the lower perch trying not to wake or startle them too much. Phew!  Now I could relax knowing they were all safe, dry & warm for the night.

Baking cookies & the jerusalem artichoke saga.

Winter has arrived. Its cold, windy and been drizzling with rain all morning. Perfect day for some baking and cooking.

Almond Butter Cookies from Simply Sugar & Gluten free. As I am trying to keep Agave to a minimum, I used half the suggested agave and the rest pureed dates.

Oat Cookies from Enlightened Cooking which are also gluten free & sugar free if you use gluten free oats. I used sultana’s instead of cranberries as its all I had.

 Jerusalem Artichokes (Sunchokes) from the garden to use for dinner.  Our two puggles have been digging them up every day and eating them, so I have had to increase our rate of harvesting before they are all gone!  Who would have thought dogs would love artichokes so much.  As I dig them up I often have two dogs & two chickens  digging/scratching at the same time.  Its becoming a battle for the artichokes around here.

Listening

I have long been amazed by the simple ‘knowing’ that resides in each and every one of us.  The little voice that can be the most precious of guides through this journey that is life.  How easy it is to lose trust. To not listen.

I came across this poem at glitterandgritgirl.com, and thought it was just perfect.

The Voice

There is a voice inside of you that whispers all day long,

“I feel this this is right for me, I know that this is wrong”,

No teacher, preacher, parent, friend, or wise man can decide,

What’s right for you-  just listen, to the voice that speaks inside.

Beautiful Rainbow @ Byron Bay 2011

Fermented Vegetables

I saw a wonderful post over at Nourishing Meals a little while ago about how to make jars of delicious fermented vegetables using water & salt.

http://www.nourishingmeals.com/2012/02/how-to-make-lacto-fermented-vegetables.html

As I wasn’t sure that I would actually like lacto-fermented vegetables, I only used small jars for my first batch.  I used organic bought carrots and then gathered from the garden some beetroots, kale & basil.  I patiently waited for 6 days, and then tried some of my home made cultured vegetables. I loved them!  So much so that I had to restrain myself from eating them all at once as I knew I would have to wait another week until I could have a new (bigger!) batch ready.

So here it is. A BIG jar of lacto-fermented vegetables.  This time I added some organic cabbage as well.  I love that I always have some tasty veggies on hand to add to meals and think they go great with eggs & bacon in the mornings.  Mostly, I love that they are a cost effective way to introduce good, healthy bacteria into your digestive system.